Planing Know-How

Many of the same concerns that you have when jointing also apply to planing. Like the jointer, the planer cuts the wood surface with knives mounted in a cutterhead. But unlike the jointer, the planer cutterhead is mounted above the table and cuts the upper surface parallel to the surface rest on the table.

CHECK THE SETUP

After changing or sharpening the knives in your planer, make a test cut. Using calipers, check the thickness of the board across the width. If the thickness isn’t precisely the same at both edges, the knives are not parallel to the table. If the planer cuts a deep snipe at the beginning or end of a board, either the bed rollers aren’t properly set or the feed roller pressure is not adjusted correctly.

CHECK THE STOCK

If necessary, clean the wood; avoid plywood and used wood. Set the feed rate and the depth of cut according to the wood species. The harder the wood, the slower the feed rate and the shallower the cut should be. The width of the stock should also affect your settings — use a slower feed and shallower cut for wide stock.

Inspect the lumber to find the grain direction and slope. As in jointing, the grain slope is important in planing. Once again you want the cutterhead to cut with the wood grain, shaving the slope downhill. You can usually find the slope simply by looking at the edge of the board. When working with rough-sawn or S2S lumber, give the edge a few licks with a hand plane to reveal the wood grain.

If it's hard to read the grain on the edge and you're surfacing plain-sawn stock, consult the "arrows" on the face of the board. Arrows form when the sawyer slices through the annual rings at an angle to the grain. If you're looking at the exterior or "bark" side of the board, these arrows point uphill. On the interior or "heart" side, they point downhill. Knowing this – and which way your cutterhead spins – you can determine how to feed the board into the planer. So I don't have to think this through every time I plane, I use this mnemonic: Bark side up, arrows advance; bark side down, arrows retreat.

PLANING WITH THE GRAIN

blade direction

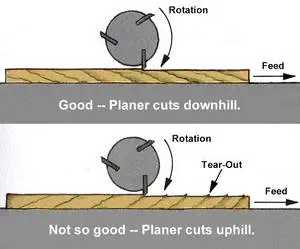
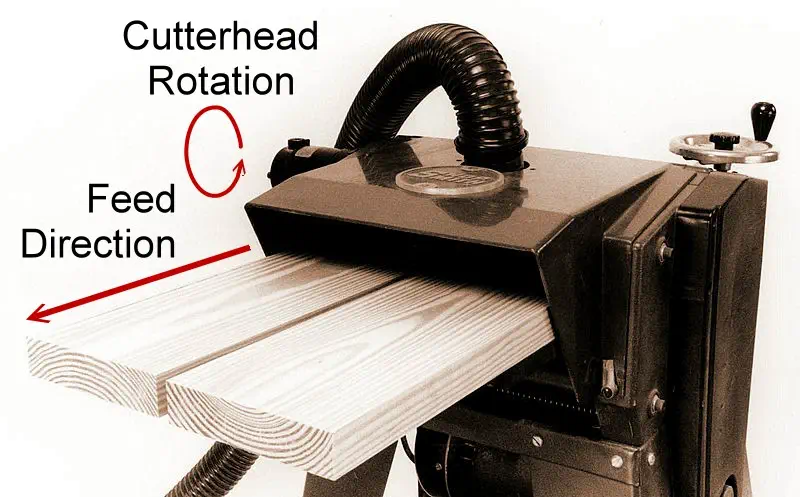
1 To avoid tearing and chipping, the knives must cut "downhill" on the grain slope.

Wood grain direction

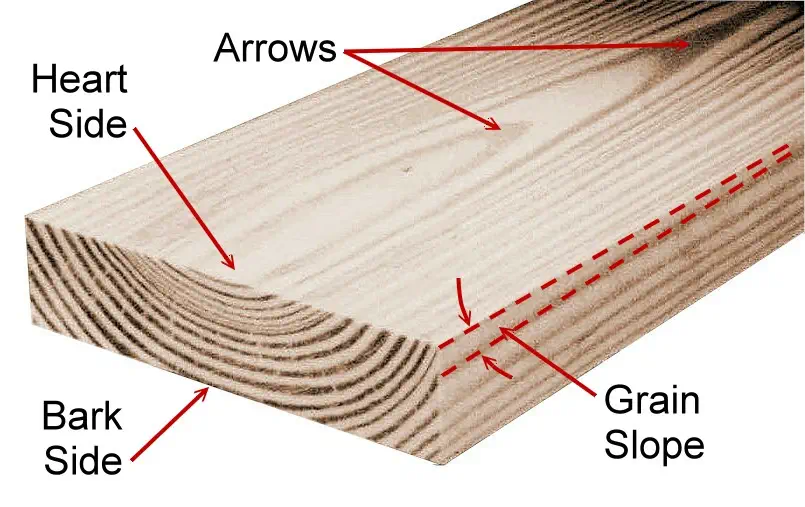
2 To determine how to feed plain-sawn stock through a planer, note which way the “arrows” point. Then inspect the end grain to find the "bark side" of the board — the side nearest the bark when the tree was standing.*

Planer feed direction

3 If the bark side is up, feed the wood in the same direction that the arrows point. If it’s down, feed it in the opposite direction.*

Straight & True

Plane equal amounts of stock from each surface of a board. This will help prevent it from cupping if there are internal tensions in the wood.

GOOD TECHNIQUE

As you work:

  • Hone or "touch up" the planer knives with a fine slipstone before you start. This not only keeps the knives sharp and produces a better surface on the wood, it greatly extends the time you can use a set of knives before you have to remove and sharpen them.
  • Wax and buff the bed of the planer to help the wood feed easily.
  • Stand on the same side of the planer as the switch. This lets you reach the switch easily and protects you from any kickback.
  • Pay careful attention to the motor speed as you plane. If the motor bogs down, the depth of cut is too deep or the feed rate is too fast..
  • If the board chips or tears out even though you think you're planing downhill, turn the board around and feed it in the opposite direction. If the tear-out continues, reduce the depth of cut.
  • Remove stock as quickly as possible until you near the desired thickness. Then take very shallow cuts at a slow feed rate. This will reduce the mill marks and produce a smoother surface.

PLANING THIN BOARDS

planing thin board

When planing a very thin board — thinner than the planer would ordinarily cut — rest it on top of a thicker board and send the two boards through the planer together.*

Just To Be Safe

Never reach under the hood or protective cover of a planer while it's running. If a board "sticks" – stops feeding – use another to push it through.

Mythconceptions

PLANER LIMITATIONS – Although a planer cuts one surface precisely parallel to another, it will not true lumber, removing cups and twists. The pressure of the feed rollers flatten the boards as they are cut. Once that pressure is released, the boards spring back to their former shape. The surfaces will be parallel, but any cup or twist will remain. The easiest way to true lumber is with a jointer. You can also use a hand plane or the router planing jig shown below.

Router Planing Jig

Figured wood doesn’t have a consistent grain direction, making it difficult to joint or plane. No matter which way you feed the wood, you’re planing with the grain part of the time and against it the other part. When you’re planing against the grain, the knives tend to lift the wood fibers and tear them out, leaving the surface chipped and gouged.

A router, however, cuts the wood from a different angle and is not as likely to tear figured grain. With the aid of this jig, you can surface small and medium-sized boards. Secure the work in the trough with wedges, and fasten the router to the extended base. Mount a 1-inch straight bit in the router, rest the base on the sides of the trough, and adjust the height of the bit to cut the stock to the proper thickness. Turn on the router and slide it back and forth across the jig, shaving the surface of the wood.

chisel edge geometry

Back to Top